
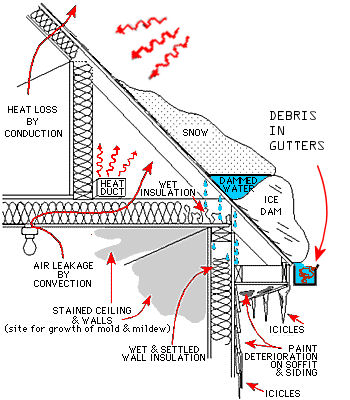
 Ice dams form from the snow on your roof melting and freezing over a period of time. This could happen quite quickly if most of the snow on your roof is that really wet, heavy kind. Depending on your home, the temperature outside could be well below freezing when you notice the drip in your ceiling or down your walls.
Ice dams are caused when the snow your roof. If the water has no place to go, it will freeze usually at or above your eaves. This frozen mess will block any further melting and water begins to puddle at the dam caused by the ice. When this happens, water will back up under the shingles and find its way into your home. This can cause damage if it is not corrected. If you're looking for a professional to take a look at your roof, Feller Roofing is a great choice.
Ice Dam Indicators
 You will need to take a trip outside and look at your roof after a fresh snow fall and look for hot spots (areas where the snow is melted) and usually caused by warm air escaping from your home and heating the underside of the roof. These can be found around skylights, chimneys, plumbing, and other roof vents. There could be other areas but we'll get to that in a bit.
 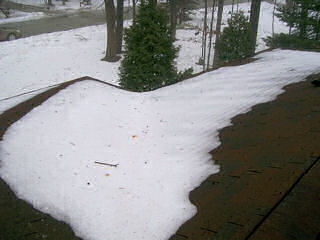 Another good indicator is those icicles hanging from your gutters or soffits.
Other indicators could be a build-up of snow in valleys of your roof and wet stains on your rafters when the rest of the roof is bare. 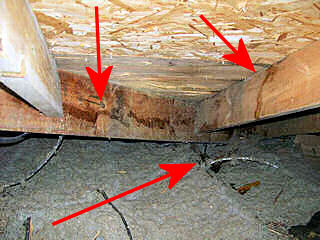 If you see this, you may have a problem and this should be addressed before the water find its way into your home.
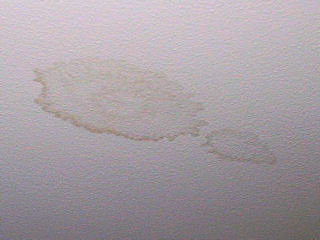 You may even see stains in the ceiling. When this happens, you know there is a problem. The source of the leak may not be obvious. Water will run downhill and the leak may not be directly above the stains.
Check your Gutters!
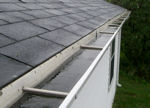 If you didn't get around to cleaning your gutters in the fall you may be paying for that now. Blocked or clogged gutters and downspouts can cause water to freeze faster than it would if your gutters were clean.
 Think about a river that's moving very slowly. Fast moving water doesn't freeze as quickly as water that isn't moving. If you have leaves, sticks, toys, or other things in your gutter water will not move very quickly and freeze. It's important to check and clean your gutters at least twice per year.
A suggestion offered to us by our friend Dave Meyer would be to paint your gutters black. Darker colors absorb more of the sun's energy helping to melt the snow. Be sure to talk with your significant other before trying this one!
Snow is a very good insulator. It will reflect the heat from the sun on the top side and will trap any heat escaping from your home on the underside. There are several things you can do to minimize or even eliminate this problem. It may take a couple of tries. Your roof will also heat up from the sun causing the snow to melt. The darker the roof’s color, the hotter it will become. The first thing you should do is to try to get as much snow off the first 4 to 6 feet from your eves as safely as possible using a roof rake. These are long, light-weight rakes that can be extended to reach to your roof from the ground. Do not climb on ladders or attempt to climb onto your roof. Ice is very slippery and whether you walk on it or set your ladder on, the odds are it won’t move, you will!
Safety First!
Now let’s talk a little about using a roof rake. Make sure you wear some protective gear including safety glasses, gloves, a good thick coat and something around your neck. A hard hat isn’t a bad idea either. You can purchase them at any home improvement store. Remember, you will be pulling the snow off the roof and more than likely you will be standing right under it! This snow may contain the ice dam and that can be very dangerous if you get hit by it. Follow all the directions that come with the rake and make sure you have a clear path behind you in case you need to get out of the way in a hurry!
Heated Roof and Gutter Cables
If the ice is too thick and won’t come down, don’t try chipping it off. You will cause more damage to your roof and shingles! There are some alternate ways to get the ice to melt. One method is to install a heated gutter and roof cable to keep the ice from forming as a solid block. This can be installed over an existing roof and gutter system and plugs into your home’s electrical system. Make sure it is plugged into a Ground Fault Circuit Interrupter (GFCI)! The cable should extend into your gutters and through your downspouts to keep an open path for the melting snow to travel. You may need to hire an electrician if you do not have exterior receptacles handy. You will want to follow the manufacturer’s installation instructions and using long extension cords are not recommended.
Ice Melt
Another method involves using a nylon stocking and professional ice melt. This type of product uses magnesium chloride, potassium chloride, and/or calcium chloride as the active ingredient. I would not recommend using sodium chloride (rock salt) because it may accelerate the corrosion of your aluminum or galvanized gutters. Fill a long nylon stocking with the ice melting product and tie off the end. The trick is to get it onto your roof perpendicular to your gutter over the ice. This will melt a channel into the ice dam allowing the water above it to flow right on through. You may need to place several of these socks every three to six feet apart if you have a long ice dam on your roof. Make sure your gutters are as clean as possible so the water will have a place to go.
Hot Water or Steam
It is possible to use a hose with hot water to melt the snow and ice off the roof. This should only be done if and ice dam has formed but it isn’t leaking. Adding more water to your leaking roof will only cause more problems! The lower the temperature below freezing, the less time you will have to get this to work. It’s not the best solution when the temperature is below 20 degrees. You will also need to be aware of the ground you are standing on. That water will freeze making your work area quite dangerous!
Trip to the Attic
A good way to prevent ice dams from forming and at the same time save your heating dollars is to take a trip into your attic. You attic space is an important part of your home. Maintaining this area can also save you money. Besides holding up your roof, your attic contains your insulation and ventilation systems that are just as important. If these are lacking, ice dams can be the result.
Vapor Barrier
Under your insulation you should find a vapor barrier. New homes use plastic. Older homes usually had paper that was attached to the first layer of insulation. Some very old homes didn’t have a vapor barrier at all. A vapor barrier helps to keep your warm moist air from leaking into your attic. You should only find one vapor barrier and that should be against the “warm side” of the attic space. This means it should be on top of the ceiling. If there is more than one, or the vapor barrier is facing the wrong direction, problems can occur. Moisture can get trapped between the layers and the insulation can become wet. If this happens, it no longer is insulating your home and can be a spot where mold could start growing. It would be best to correct this problem yourself or hire an insulation expert to give you an estimate for repairs.
Seal Gaps and Cracks
You will want to make sure that all holes to your home are properly sealed. Warm air can escape in many ways and making sure your attic is sealed to any living space definitely helps. You also want to make sure any heating or cooling ducts exposed in your attic are sealed and have a minimum of R-5 insulation wrapping them. Â A good product to use is called “Great Stuff.” It comes in an aerosol can and expands many times to seal gaps around your chimney, wiring, sill plates, etc. A couple of things to remember are, you only want to seal spaces leading to your living areas and you don’t want to seal any recessed lighting fixtures (called cans). In fact, it is important to make sure you don’t have any insulation covering these cans because earlier models aren’t designed to be covered and can overheat if they are covered.
Insulate
After the vapor barrier has been checked and any holes leading to your living space have been sealed, you should make sure you have enough insulation in your attic. Wisconsin recommends a minimum R-38 or equivalent. That means you should have the following thicknesses depending upon the insulation material used:
| Material |
R-Value per inch |
Total Thickness for R-38 |
| Fiberglass Batt |
3.14 |
12 inches |
| Fiberglass Blown |
2.2 |
18 Inches |
| Rock Wool Blown |
3.1 |
12 Inches |
| Cellulose Blown |
3.13 |
12 Inches |
| Vermiculite |
2.13 |
18 Inches |
These materials can be used together to get the same insulation value.
- For example, if you have 3-1/2″ of fiberglass batt already in your attic and want to blow in cellulose insulation here’s how to figure out how thick it needs to be to equal R-38:
- 3-1/2″x 3.14 = R-11 (This calculates the R-Value of the existing insulation)R-38 ‘R-11 = R-27 (This calculates the additional R-Value you will need to get R-38)
- R-27 / 3.13 = 8.62″(This calculates the thickness of Blown in Cellulose you will need)
That means to get an R-38 equivalent; you would need to add about 9 inches of blown in cellulose insulation. An important note if you have knob and tube wiring in your attic. It is not recommended to add insulation over this type of wiring because it could cause a fire hazard. Please check with an electrical contractor before adding insulation with this type of wiring!
Attic Ventilation
OK. You’ve checked your vapor barrier, filled any leaking holes, and your insulation is the proper depth. There is one last thing to do. Make sure your attic has the proper ventilation! Now this may appear to be a little goofy, but it is very important! While you are in your attic, have someone turn on your bathroom and kitchen exhaust fans. Nothing should be exhausting directly into your attic! If they are, these exhaust fans will need to be re-routed so they direct the exhaust air directly to the outside of your home. There are many ways to ventilate your attic. The most common methods are:
- Soffit vents (located in your eves)
- Gable vents (located on the sides of your home near the peak of the roof)
- Roof Vents (Square shaped things cut into your roof near the peak)
- Ridge Vents (A long vent made from various materials that is installed where two roof surfaces meet at the top of the home)
A well designed ventilation system will use a combination of these methods to create the proper draft to circulate the air through your attic. The rule of thumb is one square foot of free vent area for every 300 square feet of attic space. One half of this free ventilation area should be on the high side of the attic and the remainder should be on the low side of the attic. If you need help please contact a reputable roofing contractor.
Snow and Ice Barrier
If you have a new roof installed, make sure your roofing contractor includes the installation of a snow and ice barrier as part of the project. It is an impermeable membrane that is installed from the edge of the roof and extends up three to four feet from your gutters. This will prevent any water that may get under the shingles from penetrating the roof deck.
Thank You
We hope this information has been helpful. Winter can be a challenging time of the year for our homes in our northern climate. Knowing what causes ice dams and recognizing their formation can help you overcome the problems they can cause. There are many factors that need to come together to cause an ice dam and there is no good way to predict them. The moisture content of the snow, weather conditions, the energy efficiency of the home and how each family sets their thermostats all can contribute to this problem. If you need any additional information, please give us a call or drop us an e-mail. We would be happy to help!
Well, it's that time of year again in our wonderful northern climate. Snow covered roofs, chestnuts roasting, and frost tickling your nose can make a beautiful White Christmas but the beauty could be short lived if the temperatures start to rise near freezing. Water could soon find its way down your mistletoe through your ceiling! These annoying leaks are most likely caused by an ice dam.

